The Pit of Despair is a maze dungeon in the Utraean Peninsula, the multiplayer world in Dungeon Siege.
Location[]
Lying beneath an abandoned vertical mine shaft midway between the towns of Crystwind and Lang, the Pit is reached by an offshoot path in Redwood Gap which begins at the merchant Rhod Emell's campsite. Head east into the wood from Emell to reach the mine shaft, rather than west across the bridge.
History[]
Residents of Lang were aware of the abandoned shaft in Redwood Gap and emphatically warned travelers to avoid it. Unlike typical warnings of this sort which serve as a dramatic cue for Heroics™, these warnings to the player are absolutely correct. The Pit of Despair is no ordinary challenge.
The Pit of Despair is the realm below the abandoned mine shaft. It is an oppressively silent, pitch-black maze of extraordinary length, and clearly a manifestation of something's malice towards the rest of the world. No further details on its origins and purpose are ever revealed.
Walkthrough[]

Equipment will not avail you here.
The dungeon's layout is not inhumanly complex, and there are no hostile inhabitants. However, everyone attempting the maze dungeon without a map will either be defeated by the near total-darkness or endure many, many hours of torment getting through. Successfully navigating this place unassisted may very well be the most difficult and painful feat in the franchise.
Its location in the Peninsula means that entrants will probably be in the 25-35th level range. Two treasure chests at the end use a somewhat higher range than this, so they have a reasonable chance at yielding something very useful to such characters. A guaranteed drop is the Sightless Helm, a wrinkled paper bag requiring 58 Strength to put over one's head.
There are some items that can aid one in navigating the darker portions of the complex; those with 18 Strength can use a Grenade Launcher to shed faint light on the way ahead. Likewise, combat mages can use spells like Explosive Powder or Bomb to the same effect.
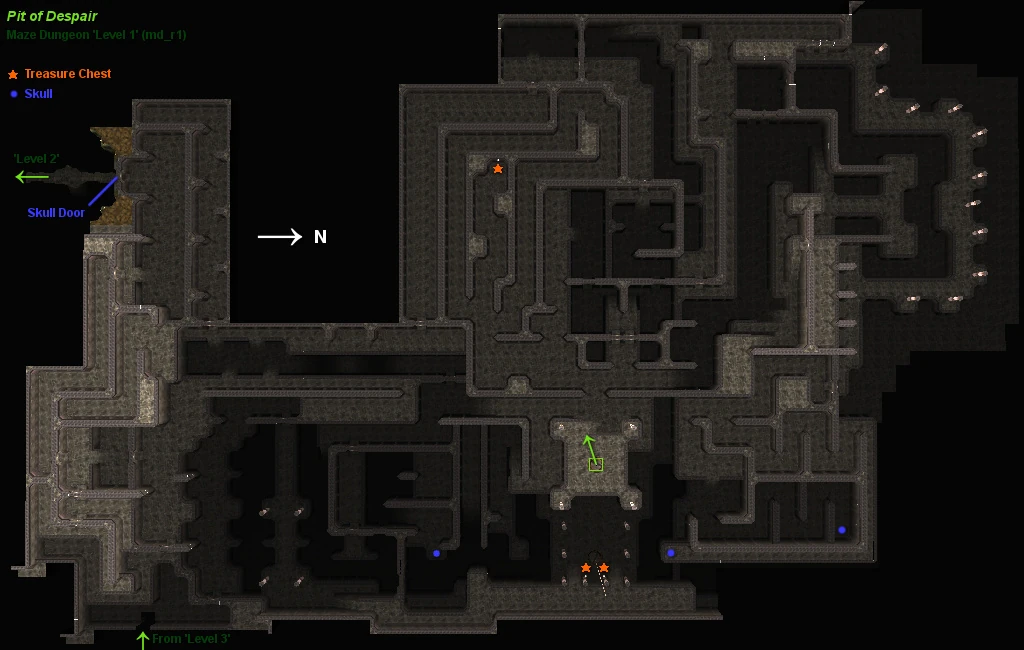
Level 1[]
- The entry point is a lift down from the Abandoned Mine Shaft. Visit the treasure chest to the west, and then wind towards the northeast end of this region to collect two Skulls. Backtrack, and in the sunken southeast area there is a third Skull.
- A door set in the far-southwest end will accept these skulls in payment for opening up the next stage.
Level 2, Area 1[]
- The solid stonework of the previous area gives way to a maze of natural bridges. Visibility gets reduced from near-nothing to extremely near-nothing. Only the player emits any light here.
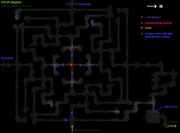
- The shortest route through this maze can be plotted from the map provided; however, a standard dungeon-crawling tactic of hugging the left side will eventually get the character through this region.


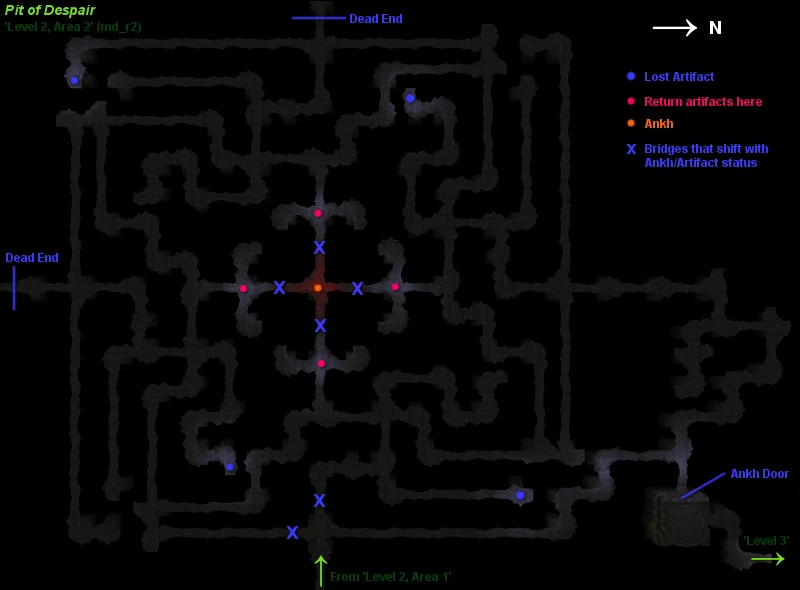
Level 2, Area 2[]
- This square maze is extremely dark, just like the previous section. However, four Lost Artifacts in the region emit a cold blue light in a limited radius, and so serve as not-always-visible landmarks. The artifacts need to be delivered to four statues. Bridges are raised into place, and an Ankh appears in the center of the region. This needs to be delivered to the Ankh Door northeast.
- It is possible when navigating this maze to click on black areas, and hope that the character is able to track a path that gets closer to an objective. It is recommended to recover all artifacts first, since each statue appears to be linked with a different one.
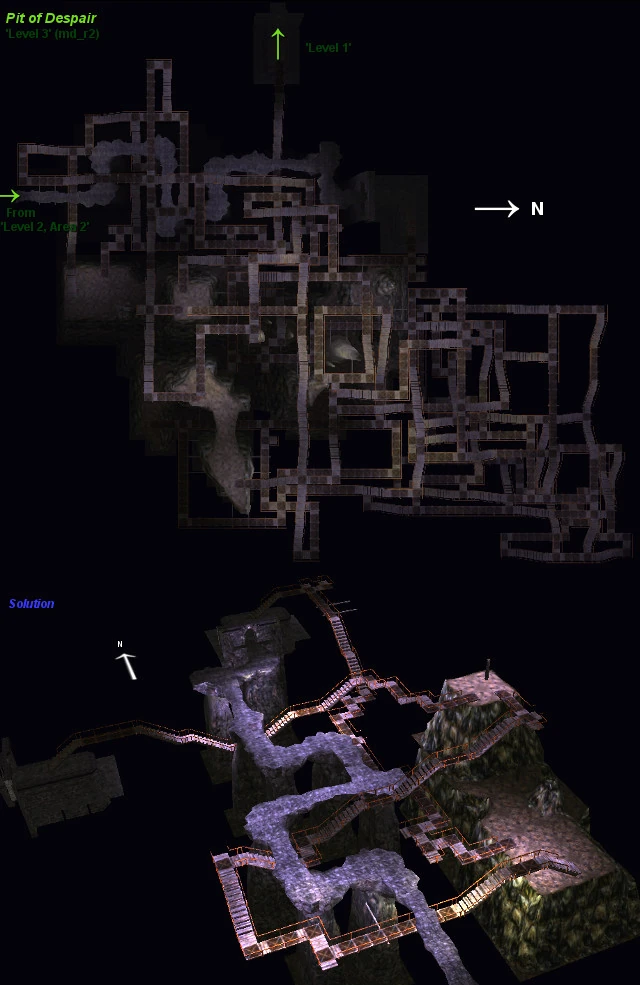
Level 3[]
- The last region is cheerfully well-lit, but only to showcase the madness on display with this enormous three-dimensional knot of Goblin causeways.
- Fortunately the entire northeastern two-thirds of the mess can be avoided. An optimal route (pictured below), is to track south from the beginning of the causeway to a solid rock plateau. The causeway picks back up, heading west and looping around to reach a higher point on the same plateau. The next section of causeway puts the character back in the previously inaccessible, final stretch of Level 1.

External Resources[]
Original Dungeon Siege Heaven Walkthrough [Author's Note: I'm plagiarizing my past self!]
Gallery[]
")
")
")
")
")
")
")
")