| Fellow adventurers! This guide is a direct upload from the original author and is no longer supported by Microsoft or Gas Powered Games. It is also not supported by the wikia's administration or members. Any errors encountered are a result of the original publication. |
Introduction[]
Triggers are extremely flexible and are connected to many other facets of the game. Once you start understanding triggers, you will be able to create everything from a simple mood change to complex scripted sequences and Non-Interactive Sequences (in-game movies)-and you don't need to know a whit of Skrit to do it!
However, "understanding triggers" is really about understanding how much of the game works. Triggers make things happen, but your ability to use them will grow as you develop a fuller understanding of what is possible and available to you (in the form of actors, gizmos, objects, nodes, animations, effects, lights, sounds, commands, etc). This will take time, so be patient, and it never hurts to study existing maps to figure out how certain things were done. We'll try to touch on a wide range of applications in this tutorial.
What You Need For This Tutorial[]
- Dungeon Siege, updated to version 1.09B or later
- Siege Editor
- Siege Editor Manual (included with the Siege Editor during installation)
- A test map you can practice with. See below for instructions on creating a simple test map.
What This Tutorial Assumes You Have Already Learned[]
- Siege Editor Manual (especially the gizmos and triggers section. The manual has an introduction to the subject of triggers, and we'll be making a lot more sense of it with this tutorial.)
- Siege U: 100
- Siege U: 200 - Dungeon Siege Concepts and Terminology
- Siege U: 201 - Templates. This is useful in understanding the concepts of template blocks, components, and properties.
What This Tutorial Will Teach You[]
Pull up a chair! You are about to learn about a very powerful object in the Siege Editor (SE). Lesson 203A will start with the basic concepts behind triggers and their basic applications. This includes:
- What Is A Trigger?
- The trigger_generic Gizmo
- Trigger Properties
- Basic Conditions And Actions
- Sending A Message
- Catalysts And Result Of Condition
- Some Trigger Examples
Lesson 203B will go into more depth on trigger topics, including:
- Conditions and Boundary Checks
- Actions and Messages
- Multiple Trigger Instances On A Single Gizmo
- Trigger Instances On Other Gizmos
- Other Triggers
- Guidelines And Errata
Creating a Test Map[]
Let's create a simple test map quickly in SE. This map will be extremely useful for this and other Siege U tutorials. It will load quickly and give you a flat area to test just about anything.
- Open SE.
- Create a new map. Call it "test". Leave the Advanced settings at the defaults.
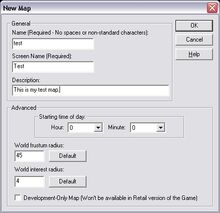
- Create a new region. Call it "flat_area". For the Starting Terrain Node, use dungeon_2/floor/t_dgn02_flr_08x08-v0.sno.

- Once the region is created, add a ring of the same floor nodes around the starting node. When you are done, you should have a 3x3 square.

- Save.
- Tank the map. Select Save Map as .dsmap from the File Menu, select the "test" map, leave the Destination File set to the default, and click OK. On the map details screen, only edit the "Title", "Author", and "Copyright" fields. Click Start.
- Once the map is completed tanking, close SE and test the map in Dungeon Siege.
Now you have a map for any lesson that calls for a test map from now on!
What is A Trigger?[]
Simply put, a trigger is a Siege Editor gizmo that makes something happen in the game when you want it to happen. To accomplish this, a trigger does two things:
- Tests to see whether certain conditions are true, and
- If true, executes certain actions.
A condition is a predetermined requirement or set of requirements that must be met before the trigger's actions will be executed. Conditions include testing whether a certain kind of object has entered, exists within, or has exited a specified area; whether the trigger has received a particular message from another object or the game itself; or both.
Actions are what the trigger does when its conditions are tested "true". Actions include the direct execution of a number of functions and the sending of messages. Messages are sent via the game's message delivery system to other objects in the game that are waiting for them, such as other triggers, gizmos, and actors.
A trigger can tell the game when it should be "tested", i.e. when exactly the game should ask the trigger whether or not its conditions are "true". The trigger can also tell the game who should be affected by the trigger's action (if the action requires a target, and the target is not known in advance. This will make more sense when we talk about "result of condition").
Finally, the trigger has a number of properties that affect how it functions in the game, such as whether or not it exists in Single Player (SP) or Multiplayer (MP) games, whether it "fires" once or as many times as its conditions are true, whether it lies dormant until activated by another event, whether it must wait a specified time until its conditions can be tested again, etc.
Triggers are crucial to creating dynamic events in the game. Here is an example list of events that triggers can help you execute:
- Change a fade or mood for a party member
- Start or stop a sound or special effect
- Turn on or off lights and light effects
- Activate or deactivate a door, chest, switch, or elevator
- Activate or change a quest or dialogue state
- Spawn a monster or change its alignment, or give it commands
- Set off a chain of other triggers and gizmos for scripted events
We're going to start learning about triggers by working with the "trigger_generic" gizmo.
The "trigger_generic" Gizmo[]
Placing the Trigger[]
Let's prepare SE for our session. If you have questions about where certain buttons and functions are located, refer to the Siege Editor Manual.
- Start SE and load your test map for editing. It would be good to have your start position very close by so you don't have to run a long way to get to your test area in-game.
- Ensure you can view and edit both Objects and Gizmos.
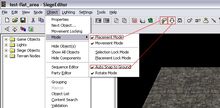
- Turn on "Auto Snap to Ground" (Object Menu | Mode).
- Turn on "Placement Mode" (Object Menu | Mode).

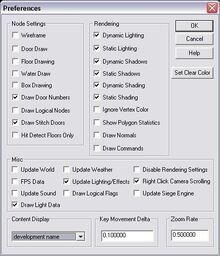
- Ensure your Content Display mode (View Menu | Preferences) is set to "fuel block" or "development name".

- Go to View Menu | Debug HUDs and set Group to "none". Check all Option boxes and "Single Object". Click OK. (We're making it so you only see Debug HUD info for the object you have selected instead of all of them, all at once.)

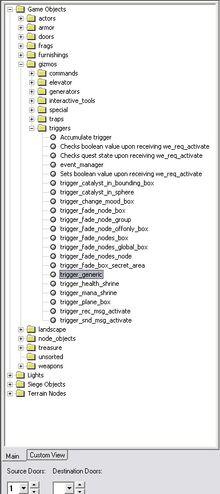
- Expand the Game Objects/gizmos/triggers folders in the left window.
- Select the "trigger_generic" gizmo.

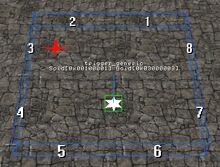
- Left-click on an empty area of your test map. A six-pointed white star should appear on the ground.
- Turn off Placement Mode so you don't keep placing triggers accidentally.
(From here on out, I won't specifically tell you to turn object placement on/off, or for that matter, give you instruction on routine SE operation. Feel free to use SE in a way that is comfortable while still following the tutorial.)
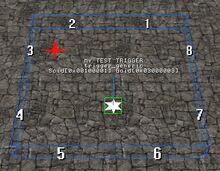
So there it is! You should see a white six-pointed star just sitting there on the ground-that's the trigger_generic gizmo. There should also be a green square around the trigger, which means it's currently selected. In addition, you should see some white text floating above the trigger, which is part of its Debug HUD info. For now, you should see the object name (trigger_generic), and some identifiers that SE just assigned to it… its SCID and GOID.
Trigger Properties[]
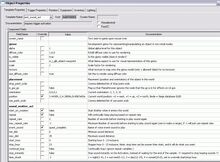
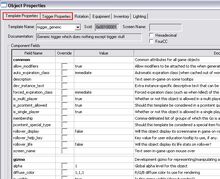
Right-click on the trigger and select "Properties" from the menu (or select the gizmo and press the default hotkey "V"). A large window with multiple tabs across the top will appear. These tabs appear for every object in the game, but they are not actually used for every object. For the trigger_generic, we will only ever use the first two tabs: "Template Properties" and "Trigger Properties".
The Template Properties Tab[]
Select the "Template Properties" tab if you haven't already. This page is similar for every object in the game. At the top of this page are several information fields, plus two checkboxes.
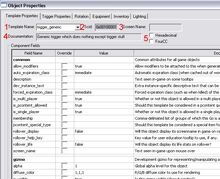
- The Template Name field shows the template name of this object, in this case "trigger_generic". Note that this is a pull-down menu. You can actually change the type of object this is by selecting a different template name from the list, but it's dangerous to do so. Let this field be purely informational and you should be fine.
- Scid shows the assigned SCID (Static Content IDentifier) of this object. You can't change it, but you can copy/paste the value. We will use this value a LOT.
- Screen name shows what text string would appear in-game if a player could select this object. Since triggers are never visible in-game, this value is empty. It cannot be changed.
- Documentation usually shows a sentence or two on the function of this object. These are informal and not always 100% accurate. This field cannot be changed.
- Finally there are two checkboxes: "Hexadecimal" and "FourCC". You can only have one of these selected at a time, or none. These boxes force the display of numbers on the "Trigger Properties" tab to be shown in hexadecimal, or in "FourCC", which is a special code specific to animation chores for actors. Selecting "FourCC" when viewing animation chores on the "Trigger Properties" tab will show them as actual words instead of a number string. When neither box is checked (default), numbers appear in their default form, either hexadecimal or real numbers.
The rest, and biggest, part of the Template Properties tab is the "Component Fields" section. This section appears for every object in the game, but the fields will be different, depending on that object's template. For the trigger_generic, we should see the [common], [gizmo], and [placement] blocks, which are generic blocks that every object has.
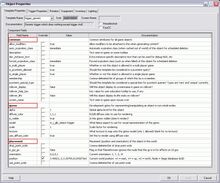
What we are looking at are key/value pairs defined in the trigger_generic template. The "Field Name" column shows the key, and the "Value" column defines the value. Right now, each field is showing the default values defined in the template. The last column is a description of the key/value pair.
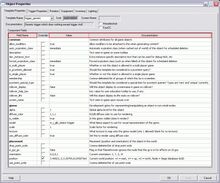
There are only a few fields we will ever (usually) modify on the trigger_generic. They are:
[common]
- dev_instance_text: This allows you to set a documentation string for this particular trigger instance, which is visible only in SE.
- is_multi_player: Sets whether or not this trigger gizmo exists in a MP game (true/false).
- is_single_player: Sets whether or not this trigger gizmo exists in a SP game (true/false).
[gizmo]
- diffuse_color: This is an RGB value for the trigger gizmo, only visible in SE. This is helpful to visually organize groups of triggers with different functions. The value for each color component ranges from 0 to 1 (not 0-255 as found in most art programs). The default value (1,1,1) is white.
The Trigger Properties Tab[]
Select the "Trigger Properties" tab.
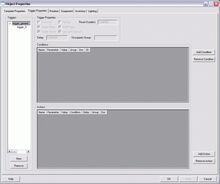
This tab is where all the work of triggering is done. There are four main sections:
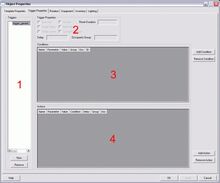
- Triggers: The white box on the left side of the window will list every trigger instance inside this trigger gizmo. It is possible to have multiple trigger instances inside a single gizmo, all working at once. The "New" button below this window will add a new trigger instance, and the "Remove" button will delete the selected instance.
- Trigger Properties: This box holds a selection of checkboxes and fields that can be set for each trigger instance. More on these later.
- Conditions: This window will list all Conditions that you set for this trigger. For a trigger to function, it must have at least one Condition. The "Add Condition" and "Remove Condition" buttons to the right of this window are self-explanatory.
- Actions: This window will show all the actions that this trigger will perform when its Conditions are true. The "Add Action" and "Remove Action" buttons to the right of this window are again self-explanatory.
Editing our First Trigger[]
Let's make this trigger do something very basic: when the player walks near it, a special effect will play. It will be easy to tell if it works or not, since if it doesn't work, we won't see any visible effect.
Set the Name[]
First we'll give this trigger a name that will be visible in SE. Go to the "Template Properties" tab in the gizmo's Properties window, left-click in the blank "dev_instance_text" value field, type "MY TEST TRIGGER" (using all-caps makes the dev name more visible in SE), and hit Enter. Notice that the "override" box is now checked. This means that this particular field has been overridden in this instance of the trigger, i.e. it is now different from the default template. If you un-check the box, the field will be reset to the template default. Leave it as-is for now, and we'll leave the rest of the fields alone as well.
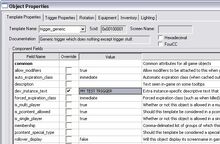
Click "Apply", then "OK", and look at your trigger.
You should see the words "MY TEST TRIGGER" floating over the trigger gizmo (if not, make sure it is selected). It is good practice to always use dev_instance_text strings to label your triggers, so you and others can make sense of them later without having to open each one.
Create the Trigger Instance[]
Now that our trigger gizmo is placed, we need to create the actual trigger instance inside of it. This is an important distinction to make: the white-star trigger gizmo we have placed doesn't actually DO anything. Its sole purpose is to be a visual representation (or "aspect") in SE. The trigger "aspect" (a SE-only mesh object) needs to have trigger instances (logical condition/action data) inside of it to perform its function. We will find later that trigger instances can live inside any kind of object, not just trigger gizmos, but we'll stick with this for now.
Go back into the trigger's Properties and select the "Trigger Properties" tab.
We won't be able to do anything here until we've created a trigger instance. If you look in the "Triggers" window (the tall white one on the left side), you will see the word "trigger_generic" there. That is the name of this gizmo (the one we have selected), in which we will create trigger instances. Use the scroll bar at the bottom of the window to scroll right, and you will see that the "trigger_generic" line also includes this gizmo's GOID and SCID.
In the bottom left-hand corner of the window, below the "Triggers" section, are two buttons: "New" and "Remove". Click "New".
Notice that now, next to the "trigger_generic" name at the top of the window, there is a "+" (plus) sign. Click it to expand the trigger_generic's new contents. A new line, underneath the first and connected to it, now reads "trigger_0". This is the first trigger instance that we've created inside the trigger_generic gizmo.
Set the Trigger Instance's Properties[]
Click on "trigger_0" to select it. You must select a trigger instance to work on it, and you can only select one trigger instance at a time (even when you are viewing the properties of multiple gizmos at once).
Note that the "Trigger Properties" section of the window has now become editable! For now, let's leave them as they are. We'll go over these in detail later.
Set the Condition(s)[]
Click the Add Condition button. The "Add Trigger Condition" box will come up, featuring a drop-down menu. The drop-down menu lists every available Condition, and we'll go over them in more detail later. For now, since we want our trigger to activate when the player walks near it, select the condition "party_member_within_sphere" and click OK.

Inside the "Conditions" window has appeared a small spreadsheet table. This is a single Condition entry. The "Name" field should show "party_member_within_sphere". The next column shows the "Parameters" of the party_member_within_sphere condition, consisting of "Radius" and "Boundary Check". The "Value" column shows the actual values of those parameters. The parameter and value pairs are unique to each type of condition, while the rest of the columns--"Group", "Doc", and "ID"--exist for every condition. We'll cover those last columns later.
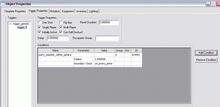
This condition checks for a party member (player's characters) within a sphere shape, centered on the gizmo itself. As such, it is a "spatial condition", i.e. the condition relies on the detection of a spatial area in the game world. The "Radius" field defines how wide the sphere actually is (2.5m radius, so 5m diameter), and the "Boundary Check" defines HOW (and WHEN) we use the sphere to check the condition.
In this case, the Boundary Check is set to "on_every_enter". This means that, every single time a party member ENTERS the sphere (crosses the boundary INTO the sphere), the condition will be tested to see if it is true. Even if the player stands inside the sphere, the condition will not be tested again until another player character ENTERS the sphere, or until he leaves and re-enters.
A trigger's actions are not executed until a condition is tested true, and in the simplest case, the action is executed at the EXACT moment the condition is tested true.
If you double-click in the Boundary Check value field, a drop-down menu will appear. These are all the boundary checks available. Leave it at "on_every_enter" for now, and we'll talk about the rest later. Feel free to edit the Radius value if you wish, but 2.5m is fine.
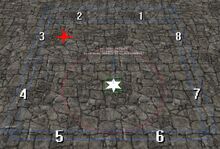
Click OK and look at your trigger. You should now see a red circle rotating around it. This red circle is the equator of the sphere you defined in the Radius value (if you don't see it, make sure the trigger is sitting on the ground and not slightly below it, or make sure your Debug HUD settings match those suggested at the top of this tutorial). If necessary, move your trigger to an area where your character can walk into the circle.
It is possible to have multiple conditions for a trigger instance, but the rules are very specific. We'll get to that later.
Now that the condition is set, let's set an Action!
Set the Action(s)[]
Re-open the trigger's properties, go to the "Trigger Properties" tab, and click the Add Action button.
Another drop-down menu appears, similar to the "Add Trigger Condition" box, except this one lists all the actions available. There are quite a number of these, and we'll go over them later, but for now let's select "call_sfx_script". This is what will play the special effect when the player enters the sphere-but never actually use this action in a real map for players. It's useful for testing and debugging, but doesn't work reliably in a MP environment. There are other gizmos to play special effects properly.

After you click OK, you will see a spreadsheet table in the "Actions" section. Similar to the Condition block, there are "Name", "Parameter", "Value", "Group", and "Doc" columns. Unique to the Action block are the "Condition" and "Delay" columns.
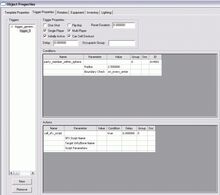
For now, we'll do two things:
- In the "SFX Script Name" value field, type "geyser_red". That's the name of a particular special effect. It will look like a red geyser shooting up from the ground with a "whoosh" sound effect.
- In the "Doc" column, type a description of this action in the first row field (only the first row's field is actually the Doc field). This is informative only, and does not appear in the game. Like the dev text on the gizmo itself, it is good practice to document each of your actions so you know what they are doing. For this one, type something like "activate red geyser".

Click OK. We now have a completed trigger. Every time any player character enters the sphere defined in the Condition section, a red geyser special effect will be activated (defined in the Action section). For the record, it is extremely easy to have multiple actions per condition, but we'll leave it at one for now.
Test the Trigger[]
Save your map. When the save dialog comes up, ensure that "Save Game Objects" is checked. If this is not checked, the changes you just made to the trigger gizmo will not be saved.
Before we look at the trigger in the game, it might be a good idea to put an object on the ground to serve as a landmark. Since the trigger gizmo is not visible in game, it might be difficult to find without some kind of identifying terrain feature. Put down a barrel, or a rug, or move the trigger next to a tree. Be sure to save objects again.
Tank your map. If you have forgotten how to do that, refer to Siege U: 100.
Open your test map in the game. Walk your character into the trigger sphere, and the red geyser sfx should play! Note that this will play each time you cross the sphere boundary INTO the sphere (on_every_enter). It does not play while standing inside the sphere or when leaving its border.
Some Crucial Concepts (And more triggers)[]
In order to more fully understand the basics of triggers; let's create a few more. We'll go through the same steps as above, but more quickly--and also cover more crucial concepts.
Sending a Message (Wiring)[]
Concepts covered:
- Basic wiring
- Gizmo: activateable sound emitter
- Condition: party_member_within_bounding_box
- Boundary Check: on_every_leave
- Action: send_world_message
The trigger we are going to make is a very common kind of trigger-one that sends a message. The only reason we didn't create one of these in the previous example is that this one uses two gizmos instead of one (a trigger gizmo to send the message, and another gizmo to receive it). Sending messages is one of the trigger's main jobs, and unless you are mostly setting fades and moods, you will use this all the time.
We're going to make a trigger that sends an "activate" message to a second gizmo when a player walks into a bounding box. This second gizmo will play a sound when the trigger sends the message.
Place the Objects[]
Open your test map in SE and place a new trigger_generic. In addition, place an activateable sound emitter nearby (Game Objects/gizmos/special/t_emt_sound_act). A warning box will appear saying "Sound emitter used in 'emt_sound_act' has no sound configured!" which is fine. Click Ignore Once until it goes away.
Configure the Sound Emitter[]
The activateable sound emitter's job is to play a sound. It is an "activateable" emitter because it can wait until it receives a message to play the sound, instead of starting as soon as it is loaded into the world. That message will come from our trigger.
We have to tell the emitter which sound to play, so select the emitter, access its Properties ("V"), and select the "Template Properties" tab. Notice there is a new template block in the "Component Fields" section compared to the trigger_generic: [sound_emitter_act]. Set the following values:
Click OK. We've just made it so the sound will not start when the emitter loads into the world, and it won't keep repeating once it's activated. We've also told it which sound to use ("quest_complete").
Note: Sound emitters don't take .wav file names to play, but instead take a name listed in "\world\global\sounds\sounddb.gas". It's beyond the scope of this tutorial to talk about how to properly enter new sounds into the sounddb, but there are many sounds already included for use. Refer to Siege U: 210 - Sounds for more information.
Configure the trigger_generic[]
Open your new trigger_generic and create a trigger instance. Add the condition "party_member_within_bounding_box". Instead of a sphere, we're going to define a rectangular area around the gizmo.
Set the "Half diag X" field to "5", creating a wide rectangular shape 5m wide. Set the Boundary Check to "on_every_leave", which will cause the trigger to fire as soon as a party member leaves the bounding box (after having first entered).
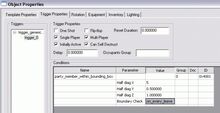
Click Add Action and select the action "send_world_message". This is one of the most common trigger actions. The default message type, "we_req_activate", is the most common message to send, and many objects expect to receive it. Luckily for us, we_req_activate is the exact message we want to send… but if you're feeling brave, double-click on the "Message Type" value field to see a list of all the messages that the game's message delivery system is capable of handling. Make sure you set it back to "we_req_activate" if you accidentally select a different one.
In the "Doc" field, type "activate sound emitter". Just getting into a good habit here. (While we're at it, go back to the "Template Properties" tab and type "PLAY SOUND" into the "dev_instance_text" field. Switch back to the "Trigger Properties" tab again.)
The most important parameter in the "send_world_message" action is "Send to Object". Note that there is a hexadecimal number there: "0x00000000", or zero. This field tells the action WHICH OBJECT to send the message to, and the way it refers to that object by the object's SCID.

[Every object (not node) in SE has a unique SCID, or "static content identifier". SE uses the SCID to uniquely identify each object it knows about-the SCID is essentially its name.]
"Wire" the Trigger to the Emitter[]
There is a quick and easy way to grab an object's SCID:
- Click OK to close the trigger Properties window.
- Select the sound emitter (the red arrow).
- Press "G" to copy the selected object's SCID to the clipboard (or right-click and choose "Copy Scid to Clipboard")
- Re-select the trigger, go into its Properties, and paste (CTRL-V) the SCID into the "send to object" value field.
- Click OK to close the trigger window.

If you pasted the correct SCID into the "send to object" field, you will now see a GREEN LINE arching from the trigger to the emitter gizmo. A small, animated arrow travels along the line to show which way the message is traveling. Above the midpoint of the line is listed the message name. In addition, you should see a light-blue rectangle shape around the trigger, showing the area of the bounding box.
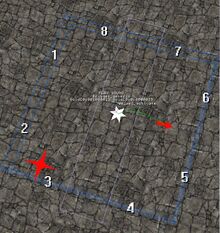
Congratulations! You have just connected, or "wired", your first trigger! Note that if you select the trigger and the emitter in turn, you will see different "HUD info" for each. In this way you can interpret what each gizmo in the chain is doing.
Test the Trigger[]
Again, save objects and load the map in the game (don't forget to tank it before exiting SE!). Every time your character enters then LEAVES the bounding box, the quest update sound should play. If it doesn't, check the above steps again, and make sure the emitter is next to the bounding box (because if it's too far away, you won't hear it).
Next we talk about another kind of trigger: the catalyst trigger.
Catalyst Trigger (Result of Condition)[]
Concepts covered:[]
- Catalysts and Result of Condition
- Gizmo: Catalyst move command
- Condition: party_member_within_node
- Boundary Check: on_first_enter
- Action: send_world_message w/ result of condition
Our next trigger will give any party member a command to walk to a waypoint when they enter a particular node. This will require the use of a new concept--the "catalyst", or "result of condition"--to solve a particular problem.
The problem is twofold:
- In order to tell the player to move to a new location, we have to know which player to command (since you can have multiple-character parties). However, ANY party member can walk into the node at any time, not just one. We won't know who will walk into it until they actually do, and we need a way to capture their identity so the Action knows who to interact with.
- Any object that is not directly placed in SE (like the starting player character, or monsters spawned from a monster generator) doesn't have a SCID. This means that we can't reference the starting character by SCID. If we can't refer to the player character by SCID, how can we send commands to it?
The answer is "result of condition".
Place the Objects[]
Place a new trigger_generic. Enter "WALK TO WAYPOINT" in its dev text field. Place a "catalyst move command" several nodes away, but still within the frustum (\Game Objects\gizmos\commands\ai\catalyst_commands\cmd_c_move). Copy the SCID of the move command.
All the catalyst move command does is provide a waypoint for a catalyst (the guy who walked into the trigger area) to move to. The command doesn't know who the catalyst will be, nor does it care. It can be a player, an NPC, a monster, or any actor that can move. We don't need to configure this gizmo at all, since its function is entirely dependent on the trigger's condition.
Configure the Trigger[]
Open the trigger_generic and create a trigger instance. Add the "party_member_within_node" condition. Set the boundary check to "on_first_enter", which will cause the trigger to fire ONLY THE FIRST TIME someone walks into our target node. Add a "send_world_message" action that sends the "we_req_activate" message, and paste the catalyst move command's SCID into the "send to object" field.
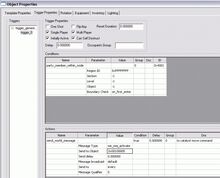
Click OK and make sure the trigger is wired to the move command. It's also a good idea to save objects at this point. Re-open the trigger and look at the party_member_within_node condition.
Sidebar - party_member_within_node
This isn't related directly to our main topic of catalysts and result of condition, but since we're trying to cover a variety of conditions in this tutorial, let's talk about party_member_within_node. The last two spatial conditions we used were tied to the gizmo's position, and created either a sphere or rectangular shape relative to it. With this condition, we aren't specifying an area around the trigger; we're specifying a particular node somewhere in the world.
There are four parameters plus a Boundary Check for this condition: "Region ID", "Section", "Level", and "Object". Rather than specifying a node's unique GUID, we will specify the region that the node appears in, and then define a series of arbitrary masks (that match existing masks already assigned to nodes) to narrow down the node range. In this way, the "node" we are detecting can actually be a single node, a number of nodes, or the entire region itself (all the nodes). This will make more sense by doing it!
With the Object Properties window still open, go to "Settings Menu | Region" at the top of the main SE window. At the bottom of the dialog that pops up is the "Region GUID". Copy this hexadecimal value to the clipboard, then click Cancel.
Go back to your Object Properties window and paste the Region GUID into the "Region ID" field of the condition. At this point, your condition is detecting any party member who enters the entire region, since the Section, Level, and Object masks are "-1" (all). We're going to narrow this down to one node, but click OK for now.

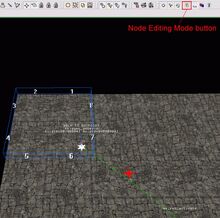
Turn on Node Editing Mode (icon on the toolbar), and click on the ground beneath your trigger (it is not crucial that your trigger sits on the very node it's referencing, but it is good form. Usually you want both to be in the frustum when the trigger fires). A blue shape defining the node should appear. Turn off Node Editing Mode.
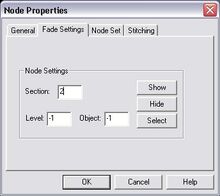
Select "Node Menu | Properties" and select the "Fade Settings" tab. Here we see the same masks from our condition: Section, Level, and Object! These three settings are arbitrary hierarchical masks.
They are arbitrary in that the game doesn't care what numerical values you enter; it doesn't use them except to match them up to other numbers we enter elsewhere (like our party_member_within_node condition).
They are hierarchical in that "Section" is the broadest identifier (there can be multiple Sections per Region), followed by "Level" (there can be multiple Levels per Section), and then "Object" (there can be multiple Objects per Level).
Finally, they are masks in that selecting a node Section of number, say "2", will select all nodes assigned a Section number of "2", regardless of their individual Level and Object numbers. Selecting a node Section and Level of "2, 1" will select all nodes with a Section of 2 and Level of 1, regardless of their individual Object numbers.
The default values are 1, -1, -1. "-1" itself is a mask, which basically means "all values". The default values mean that this node isn't affiliated with any Section, Level, or Object assignments.
Let's set the "Section" value to "2". Click OK.
Save, and this time make sure that "Save Nodes" is checked. If it isn't, the node mask you just set will not be saved, and your trigger won't work.
Go back into your trigger, and set the "Section" value there to "2". Now your trigger will detect any party members entering any nodes in this region with a Section value of 2. Since we only gave that Section number to one node, we are now truly detecting "party_member_within_node".
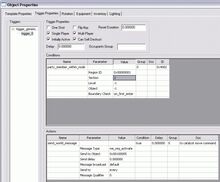
Our trigger now detects players walking into our target node and the catalyst move command will get a "we_req_activate" message from the trigger. But nothing will happen, because the catalyst move command needs to know who walked into the trigger (the catalyst) in order to tell them to move.
Catalysts[]
Triggers have the ability to pass the GOIDs of its catalysts to the Action, which sends them along with its message to the target SCID. Confused? Let's define some terms.
Every object has a unique GOID (Global Object Identifier). The GOID is how the game keeps track of all objects in the game. It is distinct from a SCID in that a SCID is used by SE to link objects together during editing. Not all objects have a SCID, but all objects have a GOID.
The catalyst is whatever object or objects causes the trigger's condition to test true. In other words, the catalyst is the "result of the condition". In our case, the catalyst will be the party member who enters our target node.
So, when our catalyst, the party member, walks into the node, the trigger must know to collect the GOID of that party member and pass it along to the catalyst move command with the "we_req_activate" message. When the catalyst move command receives the message, it also knows WHICH object to move to its location.
Configure the Action with Result of Condition[]
Back at our trigger's Condition block, notice the "ID" field to the right and the value in it. The ID will look something like this: "0x4001". This ID is unique for each condition inside a particular trigger instance. Select and copy this value.
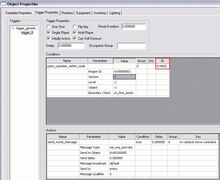
Paste the condition ID into the "Message broadcast" field of the "send_world_message" action, where it currently says "default". This ensures that the result of the above condition, the GOID of the catalyst, will be sent along with this message to the catalyst move command.
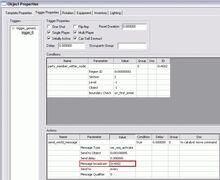
[NOTE: As of v.1.09b, there is a bug with pasting condition ID's. See below.]
[BUG: Sometimes, when creating or editing a trigger instance, the condition ID listed in the condition block will change. The change is not visible until the map is reloaded into SE. This is usually not a problem, UNLESS you've pasted that ID value into an Action's "message broadcast" field below. When the condition ID changes, the pasted value in the Action doesn't change with it, and DS/SE will throw up a scary-looking error (and the trigger won't load in the game). To fix the problem, re-open the offending trigger, copy the new condition ID, and paste it back into the "message broadcast" field, over-writing the old value. Click OK, save objects, and everything will work again. To prevent this from happening, every time you edit a trigger instance with a result of condition in it, save your work, close the editor, and then re-open that region. If the bug is present, you'll get an error, and you can go in and fix it.]
Test the Trigger[]
Click OK and save objects. Load the map in the game, and walk into the target node. As soon as your player crosses into the node (on_first_enter), he will receive a new move command and walk to the location of the catalyst move command. If he walks back into the target node a second time, the trigger will not fire due to the "on_first_enter" boundary check. To test your trigger again, just quit the game and re-start it.
NOTE: You may see your character walk to the waypoint, then walk back to where you originally clicked. That's because the catalyst move command's default behavior is to insert itself into the character's command queue instead of overriding everything. Nothing to worry about for now. We may cover that in more detail in a future Siege U 300 tutorial.
Usually, when a trigger is set to only fire once, you will want to check the "One Shot" box in the "Trigger Properties" section of the "Trigger Properties" tab. This ensures that the trigger gizmo will be unloaded from memory after it fires, saving computer resources. We'll talk more about this in Siege U: 203b.
Conclusion[]
We've covered the basic interface of the "trigger_generic" gizmo, and experimented with different kinds of spatial conditions, boundary checks, and gizmos. You should have a basic understanding of the mechanics of placing triggers and setting its properties, and have an introduction to some basic concepts.
In Siege U: 203b, we'll talk about another kind of trigger, the "message handler", and then dig into the Conditions, Boundary Checks, Actions, and Messages available to us. Finally, we'll talk about some technical issues and recommended techniques.


