| Fellow adventurers! This guide is a direct upload from the original author and is no longer supported by Microsoft or Gas Powered Games. It is also not supported by the wikia's administration or members. Any errors encountered are a result of the original publication. |
Introduction[]
Here we continue the learning we began with Siege U: 203A - Triggers I. In this lesson, we'll learn about two different kinds of "Message Handler" Conditions (Pure and Mixed), and then we'll go over Conditions, Boundary Checks, Actions, and Messages in more depth.
What You Need For This Tutorial[]
- Dungeon Siege, updated to version 1.09B or later
- Siege Editor
- Siege Editor Manual (included with the Siege Editor during installation)
- A test map you can practice with. You should have one from Siege U: 203A.
What This Tutorial Assumes You Have Already Learned[]
- Siege U: 203A - Triggers I: If you haven't read this lesson, stop right now and read it first.
What This Tutorial Will Teach You[]
This tutorial will be necessary in understanding the following future tutorials (numbers subject to change):
Overview - Spatial Conditions and Message Handlers[]
There are basically two kinds of trigger Conditions: Spatial, which we've learned a bit about in Siege U: 203A, and Message Handlers.
To reiterate, Spatial Conditions test to see whether a particular kind of object (party member, actor, go) is entering, is within, or is leaving a specified area (be it a sphere, a cube/rectangle, or a set of nodes).
A Message Handler tests to see whether the trigger has received a particular Message. As soon as it receives the message, it tests true. As mentioned in Siege U: 203A, Messages are sent via the game's message delivery system to and from both objects and the game engine itself.
There is a third kind of trigger Condition: one with both a Message Handler and a Spatial component together. We'll talk about these "Mixed" Conditions after we understand Pure Message Handlers.
The Pure Message Handler[]
Concepts covered:
- Pure Message Handler
- Condition: receive_world_message (we_entered_world / we_req_activate)
- Message Check: on_first_message / on_every_message
- Gizmo: light_enable
- Light: Point Light
- Delays on Actions
Overview[]
We're going to make a small trigger chain that turns on a light source five seconds after the trigger enters the world. We'll use two triggers, both of which will be "Pure Message Handlers".
A "Pure Message Handler" is simply an instance trigger whose only Condition is a Message Handler. Only one Condition is classified as a Message Handler, and that is "receive_world_message".
Practical Exercise[]
The "receive_world_message" Condition[]
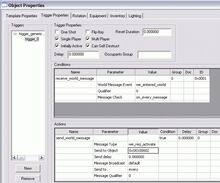
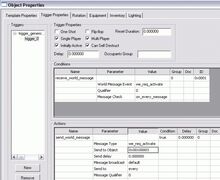
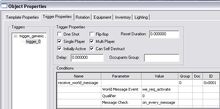
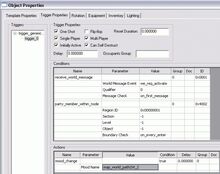
Bring up your test map and place a single trigger_generic gizmo. Give it a trigger instance and add the Condition "receive_world_message".

This Condition looks for the message specified in the "World Message Event" parameter, and tests "true" when it is received, depending on the Message Check (similar to the Boundary Check, except we're not dealing with boundaries since this isn't a Spatial Condition). Message Checks for Message Handlers are easy, since there are only two: "on_first_message", and "on_every_message". The Message Check determines whether the Condition will test "true" on either the first receipt of the specified message, or on every receipt.
Configure the First Trigger[]
The desired behavior we want for this trigger is to test true every single time it enters the world. We can do this by testing for the "we_entered_world" message with an "on_every_message" Message Check.
SIDEBAR: "WE_ENTERED_WORLD": Any time you want to test to see if an object has been created, you should always test for the "we_entered_world" message. EVERY object receives this message when it has become a valid game object capable of sending and receiving messages and doing everything a valid game object can. DO NOT use the "we_created" message-the creation of an object and its entrance into the world are two separate events, and trying to trigger actions based on an object's creation will not yield good results.
Double-click on the "World Message Event" value (currently "we_req_activate"), and select the "we_entered_world" message. You'll have to scroll up to the top of the list. By the way, don't be intimidated by the amount of messages you see listed; in basic to intermediate triggering, there are only a few messages that are truly useful to you. Make sure the Message Check is set to "on_every_message".
Add the "send_world_message" Action (default message is "we_req_activate") and click OK.

Our new trigger uses the second-most common message used with a Message Handler: we_entered_world. It will now test true every single time it enters the world, and send a "we_req_activate" message to a target we haven't specified yet. Incidentally, the "we_req_activate" message is THE most common message used with a Message Handler, and not coincidentally, our second trigger will test for that.
Configure the Second Trigger[]
Drop down a second trigger_generic gizmo nearby. Copy this new trigger's SCID and paste it into the "send to object" field of our first trigger's Action, and click OK.

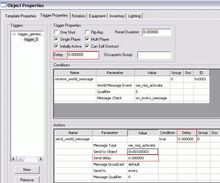
Open the new trigger again and add a trigger instance, then give it a "receive_world_message" Condition with the "we_req_activate" parameter.
Add the "send_world_message" Action, leaving the message at "we_req_activate" and the target SCID empty for now, and click OK.

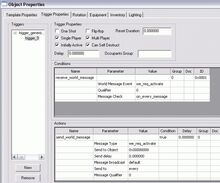
Our second trigger will listen for the "we_req_activate" message sent from the first trigger, and itself will send a "we_req_activate" message to our final target-the light_enable gizmo-that we'll place next.
If you're wondering why we didn't just send an activate message to the light_enable gizmo from the first trigger, there's no reason why we couldn't have. We're using two triggers in this example, each receiving a different message, to demonstrate the two most common ways a Message Handler Condition is used: either to detect when the trigger enters the world, or to receive an activate message from another object.
Place and Wire the Light Objects[]
Now let's drop a "light_enable" gizmo (/Game Objects/gizmos/commands/effects/light_enable) and a Point Light (/Lights/Point Light) nearby. If you don't see the Point Light when you place it, make sure "View Lights" and "Light Editing Mode" are both toggled on via the Toolbar buttons.
The Point Light is one of only two placeable objects (the other being the Spot Light) that can affect lighting locally in a region. The Point Light sheds light in all directions in a certain radius, while the Spot Light shines in one general direction. All placed lights are ON by default unless an object like the "light_enable" gizmo modifies its properties.
Left-click and hold on the Point Light, hold down SHIFT, move it a few feet above the ground, then release. You should see the ground around the light illuminate. If you don't, be sure "Ignore Vertex Color" in Preferences is OFF. If necessary, move the light close to your triggers, then Save. When the Save dialog box appears, check both "Save Lights" AND "Save Nodes" (in addition to "Save Game Objects"). You're saving lights to save the position of the light object, but you're saving nodes so the nodes will appear illuminated in the game. If you don't save Nodes, the light effects won't be visible on node textures.

Now that we know our light will appear in the region, we need to wire it so it won't start lit. The "light_enable" gizmo basically turns light objects on and off when it receives a "we_req_activate" message. In order for the light_enable gizmo to know which light to affect, it needs to know the light's special identifier, the "Light Guid".
Right-click on the Point Light object and select "Copy Light Guid to Clipboard". Open the light_enable gizmo's properties and paste the Light Guid value into the "siege_light" field under the [light_enable] block in the Component Fields section of the Template Properties tab (whew). Also set the following flags:

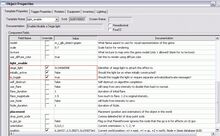
Now our light_enable will cause our light object to start the game OFF, and it will turn the light on or off every time it receives a "we_req_activate" message from our triggers. Click OK.
Finally, copy the SCID of the light_enable gizmo and paste it into the "send to object" field of the second trigger's Action.

We're not done quite yet, though. We're going to set a delay on this trigger's Action.
Set the Delay[]
Our second trigger is going to send a "we_req_activate" message to the light_enable gizmo every time it itself receives a "we_req_activate" message from our first trigger. However, we don't want the second trigger to send its message to the light_enable gizmo right away-we want to give that Action a delay.
The delay value determines how many seconds AFTER THE CONDITION TESTS TRUE the message will be delivered. In actuality, an Action's message is sent immediately to the game' messaging system when the Condition tests "true", but isn't delivered to the target object until the delay has elapsed.
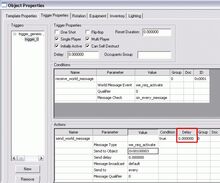
If you look at the "Trigger Properties" tab, you might notice that there are THREE fields to set a delay! There is a "Delay" box in the "Trigger Properties" section at the top of this tab, there is a "Send delay" parameter as part of the "send_world_message" Action, and there is a "Delay" column on the right side of the Action block.

To reduce confusion and possible errors, we are only ever going to use ONE of these: the "Delay" column on the right side of the Action block. This Delay field exists in every kind of Action block, and will be very visible when looking at triggers with multiple Actions. So, to be clear:
THE OFFICIALLY SANCTIONED PLACE TO SET THE DELAY FOR AN ACTION IS THE FIRST ROW (PER ACTION) OF THE "DELAY" COLUMN ON THE RIGHT SIDE OF THE ACTION BLOCK.

The other two fields are legacy fields from previous versions of the engine. To be honest, nobody is sure if the other two fields even work, and if they do, where exactly their delay is programmed to take place. Because they cause confusion, they may be removed in future versions of SE. In order to ensure that your delays will work today and across future patches, use the field described above.
Now that we know what field to use, just plunk the value "5" in there, which will cause our message to be delivered five seconds after this trigger receives the "we_req_activate" message. Click OK.

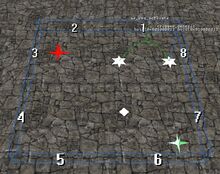
Before we move on, notice the white text above the green "wire" connecting this trigger to the light_enable gizmo. It should now say "we_req_activate (5.00)", showing that the message has a delay of five seconds.
Double-check Our Work[]
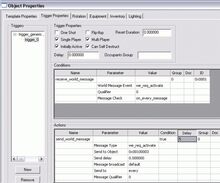
Our first trigger should have a Condition of "receive_world_message" with a parameter of "we_entered_world". Its Action should be sending a "we_req_activate" message to our second trigger's SCID.
Our second trigger should have a Condition of "receive_world_message" with a parameter of "we_req_activate". Its Action should be sending a "we_req_activate" message to the light_enable's SCID with a Delay of 5 seconds. Both triggers should have a Message Check value of "on_every_message".
Our light_enable should have the Light Guid of the Point Light pasted into its "siege_light" field, have "initially_active" set to "false", and have "is_toggle" set to "true".
Save the region making sure that "Save Objects", "Save Nodes", and "Save Lights" are checked.
By the way…did you provide documentation text for each trigger and its Actions? Look at Siege U: 203A if you don't remember how. That habit will make interpreting your more complex trigger webs MUCH easier, for you and anyone who comes later.
Test the Trigger[]
Open your test map in Dungeon Siege - don't forget to tank it in SE before firing up DS. If the first trigger isn't already in the frustum, walk there. Five seconds after the trigger enters the world, a white light should illuminate the terrain. Walk far away so the light is completely out of the frustum, and walk back. Five seconds after the light enters the world this time, it should shut off.
An oddity: if your light is next to your start position, you may see the light ON for a split-second before the light_enable turns it off. This is a limitation of how lights work, but since most lights enter the world at the edge of the frustum, it is rarely visible to the player.
If your light doesn't work, double-check all the Conditions, Messages, and SCIDs. Make sure you used the Point Light's "Light Guid" instead of its SCID. Also make sure you can see the light in SE-if you place the Point Light too far above the terrain, the terrain may not be within the light's effect radius.
Moving On
Now that we've seen how Message Handlers work, let's talk about our last type of trigger/Condition: the Mixed Condition.
Mixed Conditions (Message Handler with Spatial Condition[]
Concepts covered:
- Mixed Conditions
- One Shot triggers
- Message Check: on_first_message
- Boundary Check: wait_for_first_message / wait_for_every_message
- Action: mood_change
The Mixed Condition is our first example of a trigger with multiple Conditions. We'll talk specifically about a single Message Handler and a single Spatial Condition within the same Condition block.
Overview[]
This is a slightly more advanced trigger, and requires a good grasp of everything we've covered so far to understand its uses.
The Mixed Condition tests "true", and therefore fires its Actions, only when both of its Conditions have individually tested "true". Usually, the Spatial component of the Condition will wait to evaluate itself until the Message Handler's target message is received (i.e. it gets a "we_req_activate"). It is technically possible to use Boundary Checks to achieve different effects with Mixed Conditions (see SIDEBAR, below), but we'll use them the way they are implemented in DS.
Some restrictions: a Mixed Condition can only ever have one Message Handler. There is no such thing as a Mixed Condition with multiple Message Handlers. In the case of multiple Spatial Conditions (which I don't think were used in DS), Spatial Conditions are tested in the order they appear in the Condition block, from the top down. The Message Handler Condition is ALWAYS the first Condition in the block-SE will automatically move a Message Handler Condition to the top if it is added after a Spatial Condition.
Why Use a Mixed Condition?[]
A Mixed Condition gives you more control over the use of a Spatial Condition: specifically, when that Spatial Condition gets tested; and by extension, who gets collected as the Result of Condition.
Normally, on a trigger with a single Spatial Condition, that trigger's Action will be executed as soon as an object interacts with the border of the spatial area, i.e. when a party member walks into a sphere. Additionally, if the Action requires a "Result of Condition" value, it will only see the object that triggered it. But what if you want to assign a mood to every party member in a specific area, like the entire region? What if you need to assign that mood to the party only AFTER they have entered the spatial area, and not when they cross into or out of it?
We're going to create a trigger sequence that assigns a mood to ALL party members in the region the first time ONE of those party members enters a bounding box INSIDE the same region.
Practical Exercise[]
Place the Triggers[]
Open your test map for editing. Go ahead and delete the gizmos you placed in the first half of this article or move to a different area of your map. Place two trigger_generic gizmos reasonably close to one another. The first trigger will be our bounding box, and the second will assign the mood to everyone in the region.
Configure the First Trigger as a One Shot[]
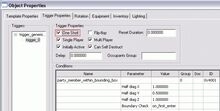
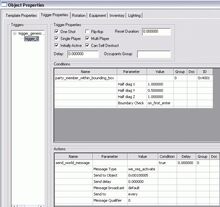
Give the first trigger the "party_member_within_bounding_box" Condition with the "on_first_enter" Boundary Check. Place it where your character can walk.

Wire a "we_req_activate" message to the second trigger.

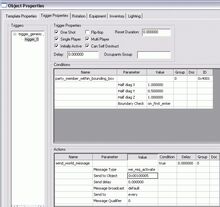
We set the "on_first_enter" Boundary Check because, in this example, we only want to set the mood once for everyone currently in the region, but not when a second character walks into the bounding box. This essentially makes this trigger good for "one shot", and then we never need to use it again.
Unfortunately, the game doesn't know we don't need it again, and will keep a small bit of memory set aside to account for this trigger both in RAM and in every save-game hereafter UNLESS we set the "One Shot" flag in the "Trigger Properties" section of the "Trigger Properties" tab. If a trigger is set to "One Shot", it will fire once and then delete itself, freeing system resources.

It is good practice then to set the "One Shot" flag anytime you need a trigger to fire once, and only once. If your trigger has a Boundary Check like "on_first_enter", it is already a one-shot in function, so it only helps to set the "One Shot" flag.
Configure the Second Trigger[]
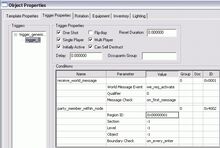
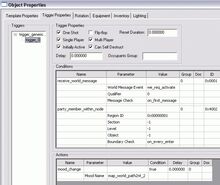
Open the second trigger, and give it the Message Handler component of our Mixed Condition: the "receive_world_message" Condition. Leave the default message as the ever-useful "we_req_activate", and set the Message Check as "on_first_message".
Because our Message Handler will only test "true" on the first reception of a "we_req_activate", it is a one-shot trigger. Set the "One Shot" flag.
Now add the spatial component. Add another Condition to the second trigger: the "party_member_within_node" Condition. Like in 203A, copy the Region GUID from the "Settings | Region" pull-down menu on the main SE window into the "Region ID" field of the Condition, and leave the rest of the fields as "-1". We are now detecting party members in every node of the region.

The Boundary Check (wait_for_first_message / wait_for_every_message)[]
There are really only two Boundary Checks you should ever use with a Mixed Condition: wait_for_first_message, and wait_for_every_message.
These are relatively new Boundary Checks made specifically for this type of Condition. These tell the Spatial component of our Mixed Condition (party_member_within_node) to WAIT to evaluate itself UNTIL the Message Handler portion of the Condition has been satisfied, i.e. when it receives the "we_req_activate" message. "Wait_for_first_message" will evaluate the Spatial component on only the FIRST reception of the Message Handler's target message (effectively making the trigger one-shot), while "wait_for_every_message" will allow the Spatial component to evaluate itself EVERY time the message is received.
In other words, the "party_member_within_node" condition will not check to see if anyone is within its node range until the trigger receives a "we_req_activate" message. If a party member is within the node range when the activate message arrives, the entire Condition tests "true", and the Action is fired. In addition, every party member inside the region when the trigger fires will be collected as the "Result of Condition", and Actions (like moods) that require Result of Condition can apply their effects to all of them at once.
Since we know this trigger is already one-shot, set the Boundary Check to "wait_for_first_message".
[SIDEBAR: Mixed Condition Boundary Checks]
The following is optional information about how Mixed Conditions actually work. Feel free to skip it if you promise to only use "wait_for_first_message" and "wait_for_every_message" Boundary Checks with Mixed Conditions. If you want to know why these Boundary Checks are a good idea, or want to use triggers in ways we didn't use them in DS (but are theoretically possible), read on.
The all-important factor in the behavior of a Mixed Condition is the Boundary Check of the spatial component. Here's why:
When the Message Handler component receives its target message (in this case, the we_req_activate from our first trigger), it then checks the status of the Spatial component. If the Spatial component also tests "true", the Action fires. HOWEVER: the Spatial component is independently keeping track of who has satisfied its Condition, and updates itself every time its Boundary Check is satisfied--not just when the Message Handler tests true. When the Message Handler comes along to check on the Spatial component, the Spatial component will report whether or not it has been set to "true" yet, and if "true", who satisfied the Condition. Since the Boundary Check determines when a Spatial Condition is satisfied, and who is detected satisfying it, the Boundary Check has the most effect on what our Mixed Condition does.
(Warning: the following example is somewhat theoretical. We stopped creating triggers this way, and the description may not be completely accurate.) For example, right now our Spatial component, the "party_member_within_node" Condition, has a default Boundary Check of "on_every_enter". This means that the Spatial component will detect every party member who walks into the node range-in our case, the entire region-at all times. The first time a party member walks into this region, the Spatial component will test "true" and stay "true", and it will remember the GUID of the party member who did it. Let's say a second party member comes along an hour later (for example purposes), enters the region, and then walks through the bounding box. When the second character walks into the region, it too is logged by the Spatial component as having satisfied the "on_every_enter" Boundary Check. Then, when the second character walks into the bounding box, our Mixed Condition's Message Handler receives its target message and tests "true". It checks the Spatial component, finds that it is already "true", and the Result of Condition are BOTH party members: the one who just entered the region and walked into the bounding box, AND the one who walked into the region an hour before. If the Action uses Result of Condition, like a mood, then both characters will receive the mood-even the party member who is now an hour away.
[End Sidebar]
Set the Second Trigger's Action[]
We now have two triggers. The first sends an activate message to the second when a party member walks through a bounding box. The second detects that message and then checks for all party members within the region.
Our second trigger needs an Action, and that Action will assign a mood to all the party members detected by the trigger.
Add the "mood_change" Action to the second trigger, and enter "map_world_path2nt_2" into the "Mood name" parameter. This mood starts white fog, snow, and music.

For the full story on Moods, see Siege U: 204 - Moods, but for now, know this: the "mood_change" Action automatically uses the Result of Condition from any and all Spatial Conditions from the Condition block. Moods cannot be assigned to anyone from a Pure Message Handler.
Double-check Our Work[]
First trigger:
- Condition: party_member_within_bounding_box
- Boundary Check: on_first_enter
- Flags: One Shot
- Action: send_world_message / we_req_activate to second trigger's SCID


Second trigger:
- Mixed Condition:
- Message Handler: receive_world_message / we_req_activate
- Message Check: on_first_message
- Spatial Condition: party_member_within_node with Region GUID (-1,-1,-1)
- Boundary Check: wait_for_first_message
- Flags: One Shot
- Action: mood_change (map_world_path2nt_2)

Make sure to save Objects.
Test the Triggers[]
Start your test map. If possible, use a multi-character party just so you can see that the mood is assigned to more than one character in the region, even though a single character walked through the initial bounding box.
Walk your character into the region if he isn't there already. Note that the mood does NOT change when your character enters the region.
Walk your character into the bounding box. Immediately upon entering, EVERY party member in the region should see white fog and snow, and hear pleasant music! If we had given the mood_change action to the bounding box trigger, only the character who had walked into the bounding box would receive this mood, and not everyone in the region (even if another character was standing next to the first).
If the Message/Boundary checks were set to fire on "every" message, then every time a party member walked through the bounding box, every party member in the region would be assigned the mood.
Many of the Boss Monster encounters in DS use these types of mood triggers. Look at "dl_r1", and note what happens when the Dragon is woken up and when he dies. Another interesting use of moods and triggering is the Gresh encounter in "cf_r1".
Conclusion[]
Congratulations! By now, you should have at least a cursory knowledge of fundamental trigger concepts, terminology, and applications. Even though we tried to introduce you to various aspects of the game with different trigger examples, it is by far not a comprehensive treatment. The best place to glean additional working knowledge of triggers and how they're used is to look in the game, and of course experiment on your own!
If you have followed each tutorial so far, you should be well able to recognize most of the triggers used in the game. Moods, and especially Fades, might be a little foreign at the moment, and there are many, many Gizmos that you have yet to learn the properties of. Some of these Gizmos will be covered in future tutorials, and many can be understood simply by looking at their Properties.
The following two appendices are for reference; feel free to look them over when you're ready. The first section talks about everything on the "Trigger Properties" tab, including every Condition, Boundary Check, and Action. The second identifies commonly used Messages.
I hope this Tutorial has been helpful in learning about Triggers! If you've gone this far, pat yourself on the back, since we've really gone beyond a beginner's treatment of triggers into something more intermediate/advanced. Don't hesitate to ask questions online to your fellow classmates, and if you find someone having a hard time figuring this out, give them a hand!
Thanks for reading, and have fun!
Appendix A: A detailed look at the Trigger Properties Tab[]
There are four sections to the Trigger Properties tab:
- Triggers (white box on left side of window)
- Trigger Properties (box of fields and checkboxes at top of window)
- Conditions (middle)
- Actions (bottom)
The "Trigger" Section[]
The "Trigger" section lists each trigger instance that has been created inside the selected gizmo. The name of the gizmo is at the top of the window, and any trigger instances it contains will depend off of it with a Windows Explorer-like convention. If multiple gizmos are selected, this window will list each selected gizmo, each expandable to show their individual trigger instances.
Pressing the "New" button will add a new trigger instance to the selected gizmo (or automatically add an instance if only one gizmo is in the list) each time it is pressed.
To edit a trigger instance, click the plus (+) sign next to the gizmo name to expand the instance list, and select the instance by left-clicking on it. It is not possible to select (and therefore edit) multiple instances at once.
To remove a trigger instance, select the instance and press the "Remove" button. Removing a trigger instance will delete all Conditions and Actions associated with it.
Multiple trigger instances act independently of each other, and are functionally unaware of each other's existence. All trigger instances in a single object share the same SCID.
The "Trigger Properties" Section[]
Don't get this section confused with the "Trigger Properties" tab, on which this section is found. They should probably have different names, but we'll persevere for now. :)
All flags in this section pertain ONLY to the selected instance. Multiple instances can and will use these flags differently. These values will change visibly when different instances are selected.
- One Shot: Sets whether or not this trigger instance should delete itself after firing once. This should be set for all triggers that only fire once to free up a small amount of system resources. If this is not set, DS will set aside memory in RAM and in the save-game file to track the state of this trigger. Default: OFF.
- Single Player: Sets whether this trigger instance appears in the Single Player game. This is different than the "is_single_player" field on the "Template Properties" tab, which sets the property for the entire gizmo. If the "is_single_player" value is set to "false", it's a good idea to uncheck the "Single Player" box as well to alleviate confusion. It is much too easy to assume that the gizmo properties are the same as the trigger instance properties, and vice-versa. Default: ON.
- Initially Active: Sets whether this trigger instance will start the game in an active state, i.e. will evaluate its Conditions and fire Actions as normal. If unchecked, the trigger instance is essentially "hibernating". Inactive triggers will become active by receiving a "we_trigger_activate" message. Conversely, an active trigger will become inactive by receiving a "we_trigger_deactivate" message. This flag can be toggled multiple times by these Messages as long as the instance exists. Default: ON.
- Flip-flop (obsolete): This is a relic of the early trigger system. Originally, if this flag was set, a trigger could theoretically fire Actions based on whether the Condition was "true" or "false" at the time of its state change. The "Condition" column in the Action block was used solely for this purpose, determining if that Action fired on a "true" or "false" event. Nobody knows if this works anymore, since it relied on the old "constantly-polling" trigger system. Default: OFF.
- Multi Player: Sets whether this trigger instance appears in the Multiplayer game. Otherwise similar to the "Single Player" flag. Default: ON.
- Can Self Destruct: This should always be ON; otherwise this trigger will never leave memory ever. The checkbox is here because, at the time of this feature's implementation, it was unclear whether this value needed to be overridden by a designer. Answer: no. Default: ON.
- Reset Duration: A delay, in seconds, after a trigger has fired before its Conditions can be tested again. Rarely used, useless for one-shot triggers. Default: 0.
- Delay (obsolete): Do not use. Do not even look at this field. :)
- Occupants Group: A map-unique string value used to assign this instance to a larger group of triggers, essentially forming a "meta-trigger". A master trigger will have Conditions that detect the state of each Group member. Commonly used in Fades. See the "Conditions" section later in this document for more info. Default: (empty).
The "Conditions" Section[]
The Conditions section lists one or more Conditions in a spreadsheet block. To add a Condition, simply press the "Add Condition" button on the right. To delete a Condition, select the Condition's "Name" field and press "Remove Condition".
Each Condition block has six columns:
- Name: the name of the Condition
- Parameter: Condition-specific values that define the Condition's behavior.
- Value: Editable fields defining the actual values of the Condition's parameters.
- Group: An arbitrary number value (Default: 0) that can split the Condition block into multiple independent Conditions. Conditions with different Group numbers are evaluated separately from one another, just as if they were in separate instances. Actions with matching Group numbers fire when their Group tests "true", and ignore Conditions from other Groups in the same instance. This is primarily a resource-saving and de-cluttering device to prevent excessive Gizmo placement. See the "Group" entry under "The 'Actions' Section" below.
- Doc: An SE-only text field to document the Condition. Sometimes useful to list from where an expected message is coming from. Also used in auto-generated error messages.
- ID: A SE-generated value unique for each Condition in the instance. This value is sometimes pasted into an Action's "Message Broadcast" field to send the Result of Condition with the Action.
Types of Conditions[]
There are two types of Conditions: Message Handlers, and Spatial Conditions. Only one Message Handler may exist per Condition, but a Condition can technically contain multiple Spatial Conditions, although this was not used in DS. Conditions are always evaluated from the top down, stopping if one tests "false". A Condition with both a Message Handler and one or more Spatial Conditions is known as a Mixed Condition, and the Message Handler is ALWAYS the first Condition in a Mixed Condition block.
All Conditions are listed below with their parameters. Boundary Checks for Spatial Conditions will appear at the end of the section.
Message Handlers:[]
- Receive_world_message: the only Message Handler Condition. This Condition tests "true" on the reception of the Message specified in its "World Message Event" parameter.
- World Message Event: A drop-down list of all the Messages in the game. Common messages used in this Condition are "we_req_activate", "we_req_deactivate", "we_entered_world", and "we_req_use". See the "Messages" section below for more info. Default: we_req_activate.
- Qualifier: Not used, or unknown function. Default: 0.
- Message Check: A drop-down list of available Message Checks:
- On_first_message: This Condition will test "true" only on the first reception of the Message specified in the "World Message Event" paramete
- On_every_message: This Condition will test "true" every time the Message in the "World Message Event" parameter is received.
Spatial Conditions:
Some of the Spatial Conditions are very similar: they test for a particular object within a particular kind of area. Generally speaking, Spatial Conditions detect objects where they meet the ground, even if the object is aerial (i.e. phraks). The kind of objects tested for are:
- Actor: Any GO with an AI component, i.e. monsters, NPCs, and Party Members.
- Game Object (GO): Any object mesh with a GOID, including Actors. This basically includes anything that isn't a Node. Usually used to detect non-Actor objects.
- Party Member: Your starting character and any characters you hire, including pack mules. In MP, every player.
The following two Conditions are identical for "Actor" and "Party Member" objects (replace the asterisk (*) with "Actor" or "Party_member"). There are "GO" versions of these Conditions, but their parameters are different-see below:
- *_within_sphere: Detects if * enters/is within/leaves a specified radius around the trigger (depending on Boundary Check).
- Radius: Number in meters defining the sphere radius.
- *_within_bounding_box: Detects if * enters/is within/leaves with a specified box centered on the trigger (depending on Boundary Check).
- Half diag X: Distance in meters from trigger center to box edge on the X axis (width). Default: 1
- Half diag Y: Distance in meters from trigger center to box edge on the Y axis (height). Default: .5
- Half diag Z: Distance in meters from trigger center to box edge on the Z axis (length). Default: 1
The GO versions are as follows:
- Go_within_sphere: Detects if a specified GO (Game Object) enters/is within/leaves a specified radius around the trigger (depending on Boundary Check). This Condition can detect a single GO by SCID or multiple GOs by template name. Use SCID Index, or Template name filter, but not both at the same time.
- Radius: Number in meters defining the sphere radius.
- Scid index: Copy a single SCID to detect a specific GO. Default: 0.
- Template name filter: Enter a single template name OR multiple template names separated by commas. Will detect any GO of that template name range. Default: (empty).
- Go_within_bounding_box: Detects if a specified GO (Game Object) enters/is within/leaves a specified box centered on the trigger (depending on Boundary Check). This Condition can detect a single GO by SCID or multiple GOs by template name. Use SCID Index, or Template name filter, but not both at the same time.
- Half diag X: Distance in meters from trigger center to box edge on the X axis (width). Default: 1
- Half diag Y: Distance in meters from trigger center to box edge on the Y axis (height). Default: .5
- Half diag Z: Distance in meters from trigger center to box edge on the Z axis (length). Default: 1
- Scid index: same as above
- Template name filter: same as above
There is one more GO Condition that is quite different from the rest:
- Has_go_in_inventory: Detects if a particular GO exists in the inventory of a party member. This Condition should always be paired with at least one other Condition previous to it that tells it when to evaluate itself-either a Message Handler (evaluate when message is received) or a Spatial Condition (evaluate when an object enters an area). Otherwise, the has_go_in_inventory Condition will try to evaluate itself when it enters the frustum, which is almost never the desired behavior. In SP, the GO will be detected in any party member's inventory no matter where they are; in MP, the "player inventory" parameter determines the function:
- Player inventory: If "any", detects the GO in any MP party member's inventory. If "local", detects the GO in the inventory of any player within the same frustum as the trigger. Default: local.
- Scid index: Same as above. Default: 0.
- Template name filter: Same as above. Default: (empty).
NOTE: If your trigger doesn't work, it might be best to look at in-game examples. For working examples, search through map_world or multiplayer_world .gas files for "has_go_in_inventory".
Finally, there are number of Conditions unique to Party Members:
- Party_member_within_node: Detects if a party member enters/is within/leaves a particular Node or set of Nodes defined by the parameters. The Section/Level/Object values match identical values assigned to Nodes on the "Fade Settings" tab of the Nodes | Properties dialog box.
- Region ID: The GUID of the Region in which the Node or Nodes are found (can be copied from the "Region GUID" field of the Settings | Region dialog box).
- Section: If this value is set to anything but "-1", Nodes with an identical Section value will be selected for evaluation. "-1" means "all sections". If both Level and Object values are also set to "-1", the entire Region will be selected for evaluation. Default: "-1".
- Level: Same as Section, except there can be multiple Level values per Section.
- Object: Same as Level, except there can be multiple Object values per Level.
- Examples: Values listed in (Section,Level,Object) format:
- (-1,-1,-1): all Nodes in the specified Region
- (5,-1,-1): select all Nodes with a Section value of 5, regardless of Level or Object values.
- (5,2,-1): select all Nodes with a Section value of 5 and a Level value of 2, regardless of Object values.
- (5,2,10): select all Nodes with a Section value of 5, a Level value of 2, and an Object value of 10.
- Party_member_entered_trigger_group:
- Party_member_left_trigger_group:
A trigger group is a set of multiple sub-triggers tied to one master trigger, effectively creating one "meta-trigger". This is done to create a large Spatial trigger of irregular shape, since the trigger group's shape is the sum of its sub-trigger's areas. The sub-triggers are set up with normal Spatial Conditions, and are assigned to the trigger group by entering identical string values into the "Occupants Group" field in the "Trigger Properties" section of the "Trigger Properties" tab. The master trigger has no value entered into the "Occupants Group" field, but is given one of the two Conditions listed above. By entering the trigger group string assigned to the sub-triggers into the Condition's "Group Name" field, the master trigger is set to "listen" to all the triggers in that group.
- Party_member_within_trigger_group: Same as above, although this Condition is usually used as the Spatial component of a Mixed trigger, with the Message Handler portion telling the Condition WHEN to actually test for party members inside it. As such, only the "wait_for_first_message" and "wait_for_every_message" Boundary Checks should be used with this Condition.
Boundary Checks for Spatial Conditions[]
- While_inside (obsolete): Do not use. Replaced by "wait_for_first_message" and "wait_for_every_message"
- Wait_for_first_message: Used with the Spatial component of a Mixed Condition. The Spatial component waits to evaluate itself until the Message Handler component receives its target message. This only happens on the first reception of the message (trigger is one-shot).
- Wait_for_every_message: Used with the Spatial component of a Mixed Condition. The Spatial component waits to evaluate itself until the Message Handler component receives its target message. This occurs every time the target message is received.
- On_every_enter: The Condition is evaluated every time its target object type (Actor, GO, Party_Member) enters the Spatial area (sphere, bounding box, node, etc).
- On_first_enter: The Condition is evaluated only the FIRST time its target object type enters the Spatial area (one-shot).
- On_every_first_enter: The Condition is evaluated when its target object type enters the Spatial area, as long as another target object isn't already in it. When all the target objects leave the Spatial area, the next target object to enter (it's another "first enter") causes the Condition to be evaluated again.
- On_unique_enter: The Condition is evaluated once per unique target object. The same target object cannot satisfy this Condition more than once. For example, the same party member could not satisfy a "party_member_within_sphere" Condition with this Boundary Check the second time he walked into the sphere, but a different party member, who had not yet been into the sphere, could.
- On_every_leave: The Condition is evaluated every time its target object type leaves the Spatial area.
- On_first_leave: The Condition is evaluated the first time its target object type leaves the Spatial area (one-shot).
- On_last_leave: The Condition is evaluated the first time its target object type leaves the Spatial area, and there are no more target object types left within the area In other words, the LAST object in a group of one or more objects already inside the Spatial area to LEAVE the Spatial area will satisfy the Condition (one-shot).
- On_every_last_leave: The Condition is evaluated every time a target object leaves the Spatial area, and there are no more target object types left within the area. Same as above, but not one-shot.
The "Actions" Section
The Actions section lists one or more Actions in a spreadsheet block. To add an Action, simply press the "Add Action" button on the right. To delete an Action, select the Action's "Name" field and press "Remove Action".
Each Action block has seven columns:
- Name: the name of the Acton
- Parameter: Action-specific values that define the Action's behavior.
- Value: Editable fields defining the actual values of the Action's parameters.
- Condition: Not used (related to the obsolete "Flip Flop" flag).
- Delay: Number of seconds before this Action is executed.
- Group: Used to match an Action with a particular Condition Group. Actions with different Group numbers only fire when Conditions with the same Group numbers are satisfied. See the "Group" entry under "The 'Conditons Section" above. Default: 0.
- Doc: An SE-only text field to document the Action. It is VERY good practice to use this field to describe the Action taking place.
Types of Actions[]
There are many kinds of Actions that perform a wide variety of functions. It is beyond the immediate scope of this Lesson to fully explain each of them, especially since some of them are covered in future Tutorials. However, we will at least categorize them so you know something of what they do.
The same goes for Messages. There are literally dozens of Messages to send, but we only need to know about a few of them. We'll cover these more common messages in this next section.
Sending Messages[]
- Send_world_message: Sends the specified Message to the target SCID.
- Message Type: A drop-down list of all available Messages. Default: we_req_activate.
- Send to Object: The SCID of the object receiving this Message. This value must be set for this Action to function. Default: 0.
- Send Delay (obsolete): DO NOT USE. Use the "Delay" column to the right instead.
- Message Broadcast: This field specifies whether the "Result of Condition" is sent with the Message. To send the Result of Condition along with the Message, the "ID" value from the desired Condition is pasted here. Otherwise, this field is a drop-down menu containing two values: "Default" means no Result of Condition is sent. "All_Conditions" will send the Result of Condition from ALL Conditions with the Message. WARNING: Do not use "All_Conditions" if there is a Message Handler Condition in the Condition block-only use with a Condition containing one or more Spatial Conditions. Default: default.
- Send to: A drop-down menu containing two values: "every" and "single". If using Result of Condition, this field determines if EVERY object detected by the Condition receives this Message, or only a SINGLE object in that set. Some party commands (like "move party" (cmd_move_party)) do not function as intended if everyone in the party receives the command, instead of just one member. Default: every.
- Message Qualifer: Obsolete or unknown function.
Moods[]
- Mood_change: Changes the mood for all party members detected by the Spatial Condition. Requires a Spatial Condition in the Condition block, and automatically uses Result of Condition to assign the mood. See Siege U: 204 - Moods.
Fades and Node Properties
- Fade_nodes_outer_local_party
- Fade_nodes
- Fade_node
- Fade_nodes_global
The "fade_node*" Actions all cause nodes or groups of nodes to become visible or invisible. These Actions are used to fade the roofs off of houses when players are inside them, or fade in the next dungeon room when the door is opened. See Siege U: 205 - Fades.
- Set_camera_fade_node
- Set_occludes_camera_node
- Set_bounds_camera_node
These three Actions manipulate the "camera fade", "occludes camera", and "bounds camera" flags on an individual Node. Usually used in conjunction with Fades, especially around archways and doors.
Quests and Victory Conditions[]
- Change_quest_state: Can activate, deactivate, or complete a Quest. See Siege U: 209 - Quests.
- Victory_condition_met: This Action starts the end game sequence by referring to a "Condition Name" found in the map's "victory.gas" file (i.e. "world\maps\map_world\info\victory.gas"). This was used to end the SP game when Gom was killed.
Manipulate Actors
- Change_actor_life
- Change_actor_mana
Fairly self-explanatory-each command can directly add or subtract from an actor's life or mana value. They can manipulate a single Actor (by SCID) or can use Result of Condition.
Other
- Call_sfx_script: Debug use only. Fires a particular special effect. DO NOT USE in normal maps-use effect emitter gizmos instead.
- Play_sound: Debug use only. Plays a .wav file. DO NOT USE in normal maps-use sound emitter gizmos instead.
- Set_interest_radius: An advanced Action to specifically change a player's "interest radius", which can help game performance. In brief, objects marked as "interest items" are not rendered if the node they are placed on is outside this radius. Used in towns to avoid excessive non-visible object loading, but it doesn't work all that well since house nodes are big.
- Set_player_world_location: This is used in MP to show those "XXX has entered YYY" messages at the top of the screen. The "World Location" value is gotten from "world_locations.gas" (i.e. \world\maps\multiplayer_world\info\world_locations.gas).
- Start_camera_fx: The camera begins zooming in and out very quickly, focusing on go-go dancers in cages that pop out of the ground. Colored lights whirl everywhere. (Actually, this isn't used, and nobody remembers what it does.)
Appendix B: Messages[]
Triggers use Messages to either detect when certain events take place (by listening for them with a Condition), or cause certain events to take place (by sending them with an Action).
Actions are sent and received by almost every object in the game, AND the game engine itself. Most messages are sent automatically on a certain event; for example, every time an object enters the world, it sends a "we_entered_world" message to the game. Every time an actor dies, it sends the "we_killed" message. The game listens for these messages to keep track of what is going on, but our triggers can also listen for them to execute Actions at appropriate times. Many objects also listen for messages, since they are programmed to perform a certain function when they receive it. For example, the emt_sound_act emitter will start playing a sound when it receives a "we_req_activate". A dungeon door will open when it receives a "we_req_use".
There are dozens upon dozens of Messages that can be used with the "receive_world_message" Condition and the "send_world_message" Action. We are going to look at the most common Messages to use with triggers.
Most of these Messages can be sent via Actions, but some can only be received via the "receive_world_message" Condition. The first two are Actions specific to trigger function:
- We_trigger_activate: This sets the "Initially Active" flag to ON for ALL trigger instances inside the target object. Inactive trigger instances that receive this message will immediately become Active and function normally.
- We_trigger_deactivate: This sets the "Initially Active" flag to OFF for ALL trigger instances inside the target object. Active trigger instances that receive this message will immediately become Inactive and stop evaluating its Condition(s).
- We_req_activate: This sends the generic "activate" message. Many objects are programmed to do something when this message is received (e.g. most gizmos). Triggers aren't inherently programmed to DO anything on their own when this message is received, but it is the most common message "listened" for with the "receive_world_message" Condition.
- We_req_deactivate: The flip side of "we_req_activate". Many objects are programmed to "turn off" when this message is received (e.g. light_enable gizmos). Triggers perform no function when this message is received, but the "deactivate" message can be used as an alternative to "activate", especially when needing more than one generic message.
- We_req_use: Many objects that interact with players (e.g. doors, chests, switches, etc) send this message when clicked on. Sending this message to such objects will usually manipulate them just as if a player had done it (e.g. doors will open, switches will throw), and trigger instances on these objects listening for this Message will fire when the objects are used. Otherwise, triggers can use this message as a third generic message when needing more than the above two.
- We_entered_world: This Message cannot be sent, only received by the "receive_world_message" Condition. Every object sends this message when it enters the world. "Entering the world" is basically the moment that the object becomes a valid game object. This message should be used anytime you want to detect an object being created, being moved into the frustum, or otherwise entering the world. This message is commonly used to fire triggers when the game begins.
- We_killed: Used by Conditions to detect when an Actor dies.
- We_req_delete: Any object receiving this Message will try to delete itself from the world. Don't use on Actors, since they drop their inventory when deleted.
- We_req_die: Ask the target Actor to die. Pretty sure this works.
- We_req_talk_begin: When used in an Action, tells the target Actor to begin a conversation. When used in a Condition, it detects when a conversation begins.
- We_req_talk_end: Usually used by Conditions to detect when a conversation has ended.